How to Dial In Espresso: The Basics
A couple notes before we begin:
1) The dialling-in guide below is only one of the many ways an espresso shot can dialled. There are variations to this technique, and many different shot profiles that one can use. That said, if you’ve just started your espresso journey, I’ve found this particular step-by-step technique to be the easiest way to familiarise yourself with the basic principles of espresso extraction.
3) The 1:2 in 30 seconds “rule” is but a guide in pulling a good shot of espresso. It is not the be-all and end-all, and the sooner you let go of the need to hit these parameters exactly, the easier it will be to dial in your next coffee.
When dialling in an espresso shot, there are three main variables you can adjust to affect the taste of your espresso.
- Dose a.k.a. grams of coffee in
- Brew ratio a.k.a dose in:espresso out. For example, 40g of espresso extracted from 20g of dry grounds is often expressed as a brew ratio of 1:2
- Grind size or Shot time
1. Lock in your dose
Choose a dose that best suits your basket. Underdosing can lead to a soupy puck (though this does not always indicate a bad shot), while overdosing can cause your puck to contact the shower screen, leading to uneven flow of water through the puck.
Also note that higher doses of coffee are harder to evenly and fully extract. This is especially true for lighter roasts as these coffees are generally less soluble. If you find yourself struggling to achieve adequate extraction levels, and your shots are tasting sour despite pulling longer ratios, try dosing 1-2g less in the basket.
Note: While dose is a variable that can also affect shot time, for simplicity’s sake, it is easier to lock in dose first and adjust shot time via changing grind size.
For the sake of this example, lets say we are locking in a dose of 18g
2. Quick grind size adjustment
Once your dose is locked in, adjust your grind size so that your shot parameters fall within the ballpark of a 1:2 ratio shot taking 25-35s. A finer grind size will increase shot time, while a coarser grind size will decrease shot time.
For example, if your current grind setting takes 15 seconds to reach your desired espresso yield, adjust your grinder finer to slow down your shot. If it takes 50+ seconds to reach your target yield, coarsen up your grind to get your shot to flow faster.
Don’t agonize too much over grind at this stage, we will refine our grind size after we look closer at brew ratio. For now, a grind size that gives you around a 30 second shot will suffice.
3. Adjust brew ratio to taste
Once your shot is pulling in the ballpark of 20-35s, we can now adjust brew ratio based to what the shot tastes like.
A 1:2 brew ratio with a 18g dose in would give us a yield of 36g espresso out.
Is the shot tasting too sour? Increase your brew ratio and instead try pulling a 18g/40g, or even 18/44g ratio.
Is the shot tasting too bitter? Shorten the ratio and instead try 18g/32g.
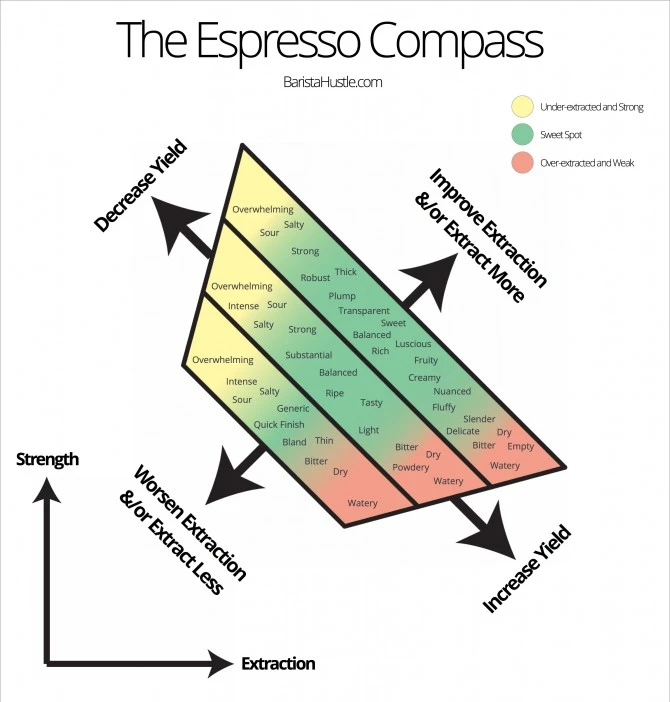
For a more detailed guide on how espresso flavour changes with brew ratio, take a look at Barista Hustle’s Espresso Compass. Increasing brew ratio will make changes along the Increase Yield trajectory, and decreasing brew ratio will Decrease Yield. Do not confuse the compass’ Extract More/Less arrows with brew ratio. These terms, when used with BH’s espresso compass, relates to extracting more/less via grind size (see Step 4).
If your shot is tasting both bitter and sour at the same time, you’re probably extracting unevenly due to channeling - work on your puck prep!
Lets say that a brew ratio of 18g/40g is giving us the most balanced tasting shot, with balanced acidity, gentle sweetness, and no astringency
4. Hone in your grind
Once you’ve found the ratio that works best for this particular coffee, we want to work on increasing our extraction potential. A finer grind will expose more of the coffee solubles to water and allow more coffee to be extracted. This will generally increase the flavor complexity, body, and texture of the shot.
As a general rule, you want to grind as fine as you can while still achieving a tasty, balanced shot. At some point, your grind will be too fine, water will struggle to flow evenly through the puck, extraction will diminish, and your shot will start tasting underextracted. It is not uncommon to see shots flow faster when you grind too fine - this is an indication of “channelling”, where water has found the path of least resistance and carved a hole(s) through your puck.
If you find that flavour starts to drop off, you’ve gone into ‘too fine’ territory. Grind one step coarser, and, as a general rule, this will likely be the best grind size for your current recipe (turbo shots not withstanding, but we’ll save that topic for another guide.)
Do not worry too much about going over the recommended 25-35seconds that is often spread as gospel. While many shots will be tastiest in this range, you will encounter beans that prove the exception to the rule. It is not uncommon to pull a delicious light roast that takes >40secs to reach target yield. Let taste be your guide.
Congratulations, you’ve dialled in your shot! Give yourself a pat on the back and enjoy that tasty espresso.
Bonus round
Brew temperatures can play a big role in extraction, especially if you’re brewing beans that are roasted very light or very dark. Most beginner machines are set to 200F/93.5c, but for those of you with machines capable of temperature adjustment, this is another variable you can play with once you’ve locked in your dose, ratio, and grind size.
As a general rule, lower temperatures will extract less while higher temperatures will extract more.
“Help! My shot tastes bad no matter what I do!”
If you find that the shot doesn’t taste good no matter what, it could be your beans, not you! Try cupping your beans to get an overall sense of flavour and an indication of what your shot could taste like. If your beans taste overly sour or bitter during your cupping, chances are you won’t be able to get a shot that doesn’t taste that way as espresso.
Check out this video by James Hoffmann on how to cup coffee at home.
“I’ve mastered this technique. What next?”
One you’ve mastered the basics of dose, ratio, and shot time, you’re ready to take a deeper look at the many variables one can manipulate to improve the quality of extraction and the resultant cup. @Shotwell’s guide to Preferential Extraction is an excellent place to start. Interested in learning more about the various espresso profiles you’ve heard about like ‘blooming espresso’, ‘dipper style’ and ‘slayer shots’? @Shotwell has you covered here with his guide on espresso profilling.
Turbo shots
A special shout-out to turbo shots, an espresso profile for those ready to, as Shotwell puts it, “rewrite the part of your brain that tells you fast extractions at low pressure won’t work.” I’ve found that the turbo shot is the most forgiving of all espresso profiles, no matter the setup. If your grinder isn’t the best, your machine is pumping out 15 bars, and uneven extractions are getting you down, check out Michael Cameron’s guide to turbo shots here and here. If your machine and grinder are excellent, and you’re having zero issues dialling in a ‘traditional’ shot, I’d encourage you to explore turbo shots anyway. They’re a ton of fun and you just might discover a new way of making really tasty espresso.